Why Your Website Needs a Sitemap

Imagine if the construction crew who built your house skipped the blueprint. You’d end up living in a place with doors that lead nowhere and staircases that sharply drop off — if you even have them at all.

Blueprints ensure that your home is inviting, logical, and helpful to your everyday life. A similar thing happens with your website. Like your home, it should also have a blueprint, or sitemap as it’s known in the digital world.

What is a sitemap?

A sitemap is like a beautifully organized file cabinet (no messy manila file folders here). It organizes your website’s content in a hierarchical structure so that search engines can better locate, crawl, and index the content — all of which tells the search engine which pages are most important.

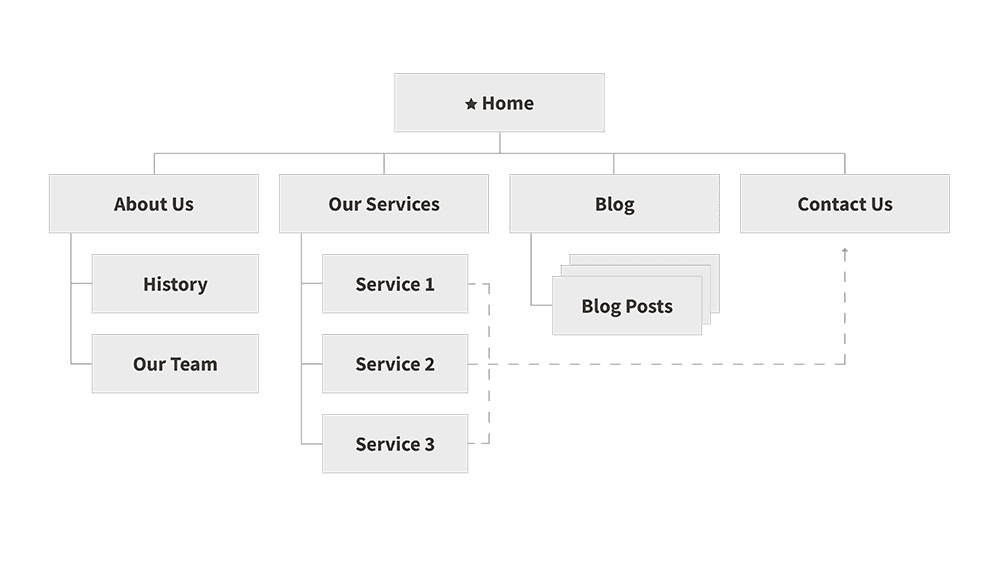
Flow chart diagrams or neat lists are the most common sitemap styles. Most sitemap diagrams display each page as a rectangle with lines which indicate the hierarchical relationship between pages. More advanced sitemaps may also show which pages link to one another. These visual connections represent the path that a user is likely to take when navigating your site.

Why do I need a sitemap?

Better organization and usability often equates with the one thing many site owners want most: better search engine optimization (SEO). Like humans, robots work better when organized. Having a well-structured sitemap will let search engines like Google crawl your website more efficiently and serve up more relevant results.

Users shouldn’t have to hunt for information on your site. Instead, your website should be navigable and help them follow a logical trail of information. For example, the homepage may lead them to your services page, which takes them to a specific service, which then leads them to an order or scheduling page; however, you may still want to place an “order now” or “contact us” button on each page to better accommodate users’ unique paths.

Moving pages around on a sitemap is much easier than doing it once the site is in development. Believe me, your developers will thank you. And once the site is live, if any new pages do need to be added, you will be able to see how they fit into the overall structure so you can find the optimal place to put them.

Sitemaps also foster better internal efficiency. Your team doesn’t need to be well-versed in computer code to read and understand your sitemap; however, you all should be familiar with your business’s content and how your consumers use it. When you know the ins and outs of your content, you can organize your sitemap in a way that optimizes the user experience and search engines’ indexing. If you’re not quite sure how your clients use your content, creating a sitemap will help you learn.

What’s next?

To get started on constructing your own sitemap:

  • Take inventory of all of the pages on your website and begin to group them in categories. Take note of overarching themes and organize content underneath each.
  • Send out a user survey to see how people are actually using your site.
  • Create a list of commonly-performed actions on your site and document the user path to completing those actions. Can you simplify the path?
  • Check your website analytics to see what pages are getting the most views and which ones are getting the least. Most-viewed pages should get more prominence and little-viewed ones can be demoted or even removed.
  • If you can access search history on your website, check to see what terms people are entering most frequently. Can you make those items easier to access?

With the new year upon us (and the organization refresh mindset at its peak), now is a great time to get your sitemap in tip-top shape. If you need an extra boost in creating or touching up your sitemap, give MJM a call — we would be delighted to help.

Interns and Mistakes

“Jennifer Aniston and your grandmother.”

I was slightly aware of the phrase’s absurdity, but I simply shut my eyes and took the creative leap. I was trying something out-of-the-box for the sake of comedic relief. While I had a hunch that this initial draft wouldn’t make the cut, I had hoped that my brash approach would weasel its way into the final script. On the contrary, the reading of my draft was met with a few chuckles from my team.

Perhaps I was blinded by the narrowness of a lone writer and arrogant with creative freedom. Nonetheless, this line taught me an invaluable lesson that followed me back into the classroom and other writing projects.

Rather than chastise me or use my writing as kindling for a dumpster fire, my team found areas of my work that still held value, and they helped me create a unique, entertaining script that didn’t rely on awkward juxtapositions.

Throughout my internship, the MJM team demonstrated patience and careful guidance. They allowed me to make a knotted mess of the page and unravel the useful threads. Consequently, I adopted a better brainstorming process and felt encouraged to take risks. This acceptance is why I felt comfortable enough to present this draft to them. My internship taught me how to fail graciously and welcome the uncomfortableness.

My advice to employers: be patient and understanding with your interns. Interns may have some college education, but most of us are also learning as we go. When you let us make mistakes, we learn and create better material.

To my fellow interns: if you live in fear of failure, you’ll never take the creative risk, and you won’t advance in your abilities. Mistakes are crucial to developing your skills and relationships with your team and just being a better human.

A week or two later, my team and I had a finished script that hardly resembled the first draft. Trial and error and unconventional concepts are what got us there. Working alongside MJM this summer as a copywriting intern has been nothing short of amazing, and I can only hope that all interns receive the same unwavering support and humility.

3 Quick Tips for Lighting Your Next Video

Even the most interesting video will fall flat if the audience is distracted by bad lighting. Here are some quick tips.

Key Light

The main light source in your shot is called the key light, and in a basic shot this light provides most of the illumination. Unless the intent is to create a dramatic effect like strong shadows across the face or a silhouette, the key light is usually placed beside or slightly behind the camera.

Fill Light

With the key light providing most of the illumination on your subject, that strong light will almost always cast some shadows on the opposite side of the subject’s face and body. In order to reduce the depth of those shadows, another softer light is often placed to fill in the darker areas, giving it the name fill light. You don’t want to eliminate all the shadows—if the light is too even, with no contrast between highlights and shadows,  your subject will look flat on camera.

Rim Light

While the key light and the fill light are generally placed in front of the subject, the rim light sits behind the subject. The purpose of the rim light is provide some definition to the edges—the rim—of your subject, visually separating them from the background elements in your shot. (Picture the thinnest crescent moon—the sun is functioning as a rim light, helping the dark moon stand out from the black background of space.) Your rim light doesn’t have to be very dramatic—just enough to make the subject pop.

Go with your instincts

These are general principles, but you should always evaluate the shot as it looks to your eye, and more importantly, in your camera.

Two Things to Know Before Setting A Media Budget

Matt Jensen Marketing has clients across town, across the U.S., and even across the pond. Because we do, we’re often researching media costs for different markets. 

When marketers reference “media” they’re traditionally talking about a combination of tactics like billboards, radio spots, television commercials, and digital ads. There are increasingly more media options for advertising, but those are the main ones. 

While the costs from different markets vary widely, the same two questions kick off every media plan we pull together. The first question to ask is what does it cost to “play” in the market where your media will appear? 

This is a ballpark estimate that should be based on:

  • Reach – how many people will see or hear your message; 
  • Frequency – how often your message will be seen or heard; and
  • Placement – where it will appear (radio, television, billboards, or online). 

Knowing what it costs to get attention in your market is a big part of answering the second question: what is our company willing to spend on media advertising? When you’re new to media buying, the costs can seem unexpectedly high. Prices vary by tactic, time of day, demand, and frequency. In other words, the price of an ad at 7:30 a.m. can be higher than it is at 2:30 p.m. even though it runs on the same radio station. 

It’s also important to consider that the media ads you buy this month aren’t likely to yield noticeable results until 6-12 months later. You need to sustain your spend for several months so that it isn’t wasted. And, while it’s tempting to snag the most affordable placements and timing, you need to consider if those are actually reaching your target audience or not. 

Recent work with one of our clients demonstrates the importance of beginning with these two questions. As part of the company’s 2022 marketing mix, its leadership team was interested in billboard and radio ads. Our team pulled together a plan that included baseline pricing, scheduling, and placement in the specific suburbs they’d chosen. The company is in one of the most expensive markets in the U.S. – easily a $50,000 monthly spend to get any traction at all with their target audience. 

The client, however, only wanted to spend $15,000 per month, not nearly enough to get the exposure they want. It was an important discovery – one we’re glad to have made early – so that we could hone in on a more effective way to spend those dollars. In this case, it was choosing just one tactic and being very specific about where those ads were placed. The added benefit of this process is that, when they are ready to make a larger investment, they’ll be better informed thanks to MJM’s research. 

Looking to begin or refine your media buying? Get started by contacting the experts at Matt Jensen Marketing.

Best Dressed Images

The best images begin before you’re in front of the lens. Whether it’s photos or videos, here are the guidelines we give clients so they can prepare for “shoot day”:

  • Keep it simple. There’s a time for fun, bright patterns and those oversized earrings you just bought, but it’s best to stick to the basics when having your photo taken. This is especially true if you won’t be the only one in the shot. Another point in favor of simplicity: you won’t be distracted by a scarf that won’t sit just right or pleats that keep bunching up. Avoid clothing with screen printed sentiments.
  • Black and gray always win. Black and gray are the most flattering shades for most skin tones and both colors are easily coordinated with your background and other people. They also never go out of style and give photos — and you — a timeless look. Don’t love black and gray? We get it. Sometimes you need a pop of color. In this case, jewel tones are the way to go. Just make sure they don’t clash with your background, a loved one, or that company color palette.
  • Limit jewelry. Keep accessories to a minimum. They can detract from your face (your smile should be the focal point) and can catch light and shadows in an unflattering way. Like clothes, they can also slide out of place, and it may not be noticed until post-photoshoot editing. A sideways necklace can’t always be edited later.
  • Comfortable and close-toed. Your footwear may not even show in your photo; however, it still helps to wear shoes you’re comfortable in. We don’t always notice it, but our footwear can promote (or detract!) from good posture, stability, and our overall demeanor. Close-toed shoes are best when you’re being photographed in cool months and in a group.

Can you capture good video on a smartphone?

One thing that keeps a lot of people from creating video content is the perceived high barrier to entry. Specialized lights, sound equipment, a camera that costs more than your car—that shopping list is the tip of the iceberg, and then you still have to learn how to use all that gear.

The good news is that you probably have a pretty decent camera in your pocket, masquerading as a phone. While there is a level of production quality that’s unattainable without the professional-grade matériel and the expertise in its use, you can still create really compelling videos with just a little extra effort and planning. Here’s a good place to start:

Three low-tech tips for shooting video on an iPhone

  1. For the love, shoot your video horizontally. Unless you can see the future, and you know with 100% certainty that your video will only ever be used on a platform that rhymes with “sick clock”, shoot your video horizontally. Vertical video is great for text to friends and family, great for Tik Tok, sometimes ok for Instagram, but if you want to get the most use out of your video rotate that phone 90 degrees and shoot away. (Your editors will thank us.)
  2. Use a tripod (or jam your phone into a potato?) Hand-held video can be interesting and fun, but it’s hard to watch for very long. You can find really simple tripods on Amazon for under $15, and that small investment can make a big improvement in the quality of your shot.
  3. Face a window. It’s hard to beat natural light. If you don’t have access to natural light, make sure you’re shooting in a bright enough location that you’re subject is well-lit. Unless you’re going for a dramatic, “interrogation room” look, don’t sit directly under a light, because it will create harsh shadows on your face. A bonus tip—if you’re mixing natural light with artificial lights, pay close attention to the “temperature” of the color. Warmer lights will lend an orangish tint to your subjects when compared to the generally bluish light from natural light sources.

If you’re working with a video editor, make sure you check with them to find out what format they prefer. We’ve also created this downloadable checklist you can use to set up your smartphone to maximize the quality of the footage you capture.

You might need a chef

I’ve mentioned editors and editing a few times in these articles, and it’s worth adding a note on that topic. The video file you capture (as well as the audio and still images) can be just one ingredient in a final polished video project. A good editor, like an experienced chef, can take simple (even boring) ingredients and craft them into something truly remarkable. A lot of the magic in the movies or television we watch is created in the editing phase of a project. Sound effects and music can add life to a simple video, and inspired editing can make a project sing.

Is video worth the cost?

As a visual thinker and as a storyteller, it’s hard for me to imagine a more potent medium than video. Books (on real, honest-to-goodness paper) will always be my first love, but video allows you to join the power and immediacy of images with the drama of a story unfolding over time. Visual elements paired with music and spoken word create an almost instant connection with the audience, and all that in an incredibly short amount of time.

Video swallows the internet

YouTube launched in 2005, and by late 2020 boasted of nearly 2 billion users.1  Since it’s very first video in 2005 (did you know that elephants have “really, really, really long trunks”?), video content has exploded, with users uploading more than 500 hours of video content to the platform every minute.2 While YouTube was the first major video platform, a parade of other media platforms have added to the ruckus. Your social media channel of choice is tripping over itself to serve you video content of all types, and with good reason—Twitter claims that tweets with video garner ten times more engagements than tweets without video3, and other platforms report similar numbers.

Is video worth the cost?

Despite all its strengths, video still has one major disadvantage when compared with other types of content: it’s hard to do well. It’s easy to thumb out a tweet or blog post, and nearly as easy to snap a semi-interesting photo, but shooting and editing even simple video content can feel more daunting.

It’s true that a well-produced video project takes feeding-a-small-army amounts of logistical planning, a fair amount of specialized (read, “expensive”) equipment, and technical skill. But armed with nothing more than a smartphone and a little planning, you can still create compelling video content. Here are some basic tips to get you started.

Why Settle for Being Persuasive? Build Buy-In Instead.

Chances are, you’ve had to be persuasive before. It’s a natural part of collaboration, leadership, and just plain being on the team. Need to build a case for more marketing dollars? Need to appeal for another employee? Need to prove that one of your tactics isn’t working and present a better way? 

Then you’ll need to be persuasive. But why stop there? Seeking buy-in — the fancy term for getting people behind something new — accomplishes goals and institutes real change better than a sales pitch ever could. But what are the hidden keys to building this precious commodity? 

First, and most importantly, don’t confuse buy-in with selling. Yes, you’re making a pitch, but true buy-in invites participants to discuss and debate. That process, and it really is a process, moves your peers from bystanders to truly vested stakeholders. Real buy-in fosters  a mutual respect that goes beyond simple compliance. The best approach is to present your ideas as drafts — something open to change — instead of foregone conclusions. 

Along with that, you’ll have to recognize that this can be a long process. At MJM, we often present proposals first to one or two leaders, who will then invite more of their colleagues to hear the presentation a second time. We’ll answer questions over email and during meetings sometimes for weeks and even months before getting the green light to move forward with the proposed project. People need time to digest and synthesize information, and you’ll be well-served to be welcoming and responsive as they do that. Consider their questions and even their pushback as positive signs that they’ve taken your plans seriously.

Second, be clear and concise about the problem, how to solve it, and how to measure progress. This is vital for creating true alignment. While we may all speak the same language, we use and interpret it differently. Your peers and superiors hear your words and apply their own conclusions and connotations to them instinctually; their perception may be very different from what you intended. That means clarity is doubly important. Avoid esoteric or vague language when possible, and use concrete dates and metrics every time you can.

Finally, be prepared. Buy-in can’t be achieved without credibility, and credibility relies on preparation. Gathering relevant data, writing out basic next steps, and consulting others with more experience are just a few ways to position yourself as a knowledgeable guide and gain the buy-in you’re seeking. 

There’s no need to build buy-in alone! Contact the experts at MJM for help communicating your company’s next big change. 

Marketing is Your Last Step

It was my first day at a new job and I walked in, quite literally, to phones that were ringing off the hook. Curious, I approached the area where a pair of receptionists, who, as pleasant as could be, were fighting a losing game of whack-a-mole with the blinking red lights on their consoles. When I asked why today had such a high call volume, they told me “It’s always like this.”

If job security had a ringtone, I had a lot of it.

However, as awesome as that was, this company wasn’t ready to handle the results of their marketing. Their team had executed a focused strategy to get their name out and it worked.

Focus on Operations First

But little attention had been paid to the infrastructure and operations necessary to handle things like call volume or adequate parking. Even more broadly, no one had considered how mundane things like poorly-designed forms or long phone wait times can undo months — and in this case years — of strategic marketing. 

When your prospective customer finally picks up the phone or fills out the contact form on your website, you must be ready to follow through on your promises. Jimmy John’s couldn’t promise “Freaky Fast Delivery” without putting in place everything possible to guarantee that delivery is, in fact, freaky fast. 

Marketing Comes Last

In other words, what many people don’t realize is that operations is the first step to effective marketing. At MJM, we take that even further. To us, operations is marketing and well-designed operations lead to a stellar patient experience that, in turn, leads to word-of-mouth referrals. Only once those things are in place should full-scale marketing efforts be launched. 

That was a welcome mindset for the receptionists whack-a-moling their way through phone call after phone call. I paused the company’s marketing that very day so we could focus on operations for a time. When we restarted our marketing plan a few months later, the phones were still ringing with one notable exception: we’d gotten better at handling our call volume.

And just about everything else we did. 

What Designers Really Do and Why You Need One

I’m Joel Jochim, and I’m a designer. 

There. I said it. 

But before you assume that I only “make pretty things” for a living, let me explain what I really do. 

Before anything can be made attractive, a designer has to become a puzzle solver who takes the constraints, wants, and needs of clients and moves them from nebulous ideas to concrete deliverables such as brand identities, billboards, slide decks, websites, social media pages, the occasional boat wrap (!) and, of course, an array of printed materials. 

It’s rare for our clients to know exactly what they want at the beginning of a project so we bring shape to their thoughts. We work through scenarios and solutions — often for weeks and even months — and, only once all the obstacles have been overcome, do we package it all in an attractive way.

Designers — especially my colleagues at MJM — also tend to take criticism and feedback with grace. We know that the honest input of others is vital to getting a project over the finish line and without it we’re only as good as our own perspective. That’s not to say we’re pushovers; we’ll share our perspective as needed. We’re just more interested in everyone else’s thoughts.

Admittedly, everybody designs things in some capacity or another. Canva and the like have made it accessible and that’s a good thing — the more people who understand what it takes to pull together something simple like a Facebook post, the better. 

A full-time designer, however, has special skill sets that can span the multiple demands of a project. We never stop learning new technology and techniques for photography, illustration, animation, video, social media, and on the list goes.

Maybe most notably, we’ll hang in there until the very end. We may miss the mark at times, but we’ll always try again…and again until we get it right for our clients. Not only are we puzzle solvers, we’re addicted to progress, to the process of making something better than it was when we started, to seeing it evolve into something that delights our clients and drives home their message. 

Sound like something your business needs? Contact the experts at MJM!